I spent a bit of today adding the capability to Veratas to collect user input in the form of a "dialog". I put "dialog" in quotes, because I used a JQuery dialog within the HTML, rather than a Gtk dialog window.
Before settling on JQuery for this project, I looked at it and YUI in some depth. I was attracted to YUI because it seems very very complete. In fact, it has a filterable and sortable data grid, which is very important to me, as most applications, when you get down to it, are really just CRUD apps.
However, I went with JQuery for Veritas because the samples and tutorials made it seem very easy to get things done, and Veritas has simple needs.
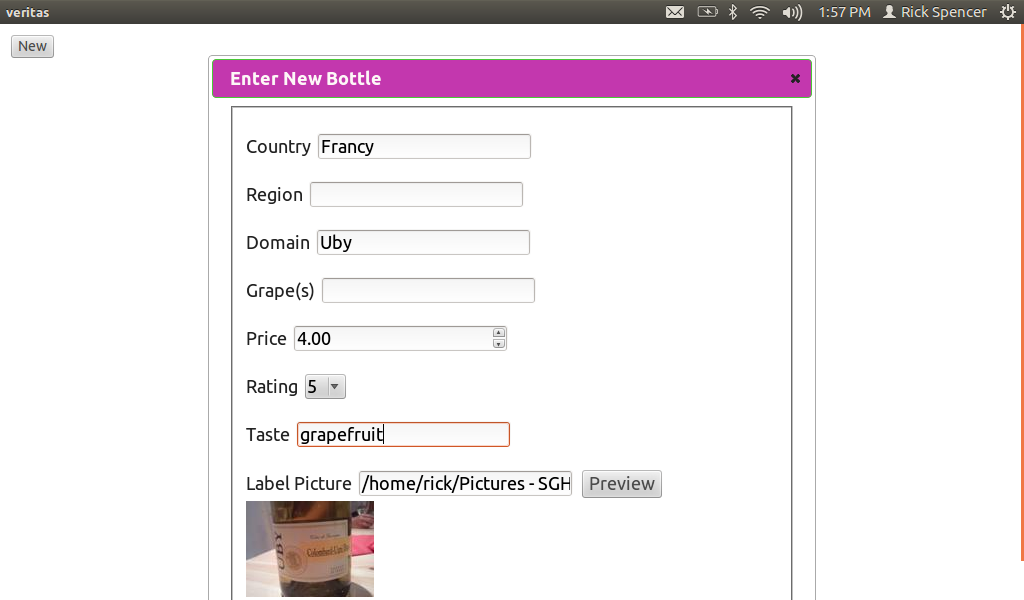
JQuery has a cool page where you can create just the javascript that you need, as well as a theme generator. Note the "grapey" dialog bar in the screenshot, I set that color in the theme generator.
What the Dialog Does
First thing was to lay out the dialog in the normal HTML way. Note that I set it to be display:none, by default.
  <div id="dialog" title="Enter New Bottle" style="display:none;width=00px">
<fieldset>
<p>
<label for="country">Country</label>
<input type="text" name="country" id="country" value="" placeholder="">
</p>
<p>
<label for="region">Region</label>
<input type="text" name="region" id="region" value="" placeholder="">
</p>
<p>
<label for="domain">Domain</label>
<input type="text" name="domain" id="domain" value="" placeholder="">
</p>
<p>
<label for="grapes">Grape(s)</label>
<input type="text" name="grapes" id="grapes" value="" placeholder="">
</p>
<p>
<label for="price">Price</label>
<input type="number" name="price" id="price" value="" placeholder="$">
</p>
<p>
<label for="rating">Rating</label>
<select name="rating" id="rating" value="" placeholder="">
 <option value="1">1</option>
 <option value="2">2</option>
 <option value="3">3</option>
 <option value="4">4</option>
 <option value="5">5</option>
 <option value="6">6</option>
 <option value="7">7</option>
 <option value="8">8</option>
 <option value="9">9</option>
 <option value="10">10</option>
</select>
</p>
<p>
<label for="taste">Taste</label>
<input type="text" name="taste" id="taste" value="" placeholder="">
</p>
<p>
<label for="image">Label Picture</label>
<input type="text" name="image" id="image" value="" placeholder="">
<button id="preview_button">Preview</button>
<img id="preview_image" src=""/>
</p>
<p>
<button id="submit_new">OK</button>
</P>
</fieldset>
</div>
Then, I created a "New" button, and wired it up to some code that I was able to get from the excellent JQuery demo pages to display the dialog. Note that the documentation made it really easy to copy and paste my way to success here, including figuring out how to choose different reveal effects and such.
        $( "#dialog" ).dialog({
      autoOpen: false,
      width: 600,
      show: "blind",
      hide: "blind"
  });
  $( "#new_button" ).click(function() {
      $( "#dialog" ).dialog( "open" );
      return false;
  });
        $( "#submit_new" ).click(function() {
       bottle = {"country": + $( "#country" ).val(),
       "region": $( "#region" ).val(),
       "domain": $( "#domain" ).val(),
       "grapes": $( "#grapes" ).val(),
       "price": $( "#price" ).val(),
       "rating": $( "#rating" ).val(),
       "taste": $( "#taste" ).val(),
       "image": $( "#image" ).val()};
       send_message("new_wine", bottle);
       $( "#dialog" ).dialog( "close" );
       return false;
   });
Yesterday, send_signal took 2 strings: the name of the signal and some other data. Today I changed it to take the name of the signal, and any javascript object. The function uses a popular JSON parcer to stringify the javascript object before using the "set title hack" to pass the data tot he back end.
function send_message(signal_name, data)
{
title = document.getElementsByTagName("title")[0];
message = {"signal": signal_name,"data":data};
title.innerHTML = JSON.stringify(message);
}
Similarly, on the back end, I made the HTMLWindow class decode the json and pass it along:
def _on_html_message(self, view, frame, title):
   if title != "null":
       try:
           message = json.loads(title)
       except Exception, inst:
           print inst
           message = {"signal":"error","data":"signal not parsed"}
   else:
       message = None
   self.on_html_message(message["signal"],message["data"])

def on_html_message(self,message):
   pass
As a result, subclasses like VeritasWidnow can just use the data without worrying about the implementation. It doesn't do anything with the data yet.
2 Way Communication
I did add one bit of round tripping. It turns out that as a security precaution, the "file" input type does not let the javascript see the full path selected, it only allows the selected file to be uploaded to the server. I hope that I can figure out how to let the user grant Veritas permissions to pass the selected file to the javascript, but I can hack around it if it doesn't turn out to be easy or possible.
Meantime, I let the user type in a full path to the file, and then click "Preview". This takes the entered string, and sends it to the back end.
    $( "#preview_button" ).click(function() {
        send_message("image_preview", $( "#image" ).val() );
        return false;
    });
The back end then uses the awesome PIL libary to make a thumbnail, and then passes the path of the thumbnail back. I actully suspect that I will be able to skip the step of saving the file and just use the string data, possible with the Canvas element.
def on_html_message(self, signal_name, data):
    if signal_name == "image_preview":
        try:
            img = Image.open(data)
            img.thumbnail((128,128), Image.ANTIALIAS)
            path = """/home/rick/.tmp/thumbnail.jpg"""
            img.save(path,"JPEG")
            path = "file://" + path
            self.view.execute_script("receive_signal('set_preview','" + path + "');")
        except Exception, inst:
            print inst.message
            self.view.execute_script("""receive_signal('set_preview_error','Could not find a valid image at %s');""" % data)
Another handy think I found today is that I can load the HTML page into Firefox, and use a web console to poke at it. Very handy. Of course, this works now because I am not doing string replacement, but I think that I can actually make a similar thing work with a WebKit window.
 Next
NextSo now that I can collect the info from the user, I'll start saving the data in a sqlite database, and then work on presenting the data to the user.
I pushed a separate branch with the JQuery code here.
This comment has been removed by the author.
ReplyDeleteThanks a lot for your kind and very helpful information.
Deleteclipping path service
A great article written.I will definitely recommend my friends to read it.
ReplyDeleteclipping path
Raster To vector
clipping path service
남양주출장샵
ReplyDelete의정부출장샵
제천출장샵
횡성출장샵
충주출장샵
부천출장샵
총판출장샵
제천출장샵
이천출장샵
영월출장샵