 |
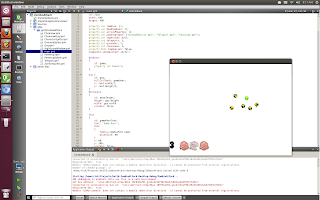
| Gotta love the "developer art" ... those placeholder images should be replaced by sweet Zombie artwork as the game nears completion. |
However, things change, and so did QML. Now, I am convinced and am diving into QML.
- The base QML libraries have pretty much everything I need to write the kinds of apps that I want to write.
- The QtCreator IDE is "just right". It has an editor with syntax highlighting and an integrated debugger (90% of what people are looking for when they ask for an IDE) and it has an integrated build/run system.
- There are some nice re-factoring features thrown in, that make it easier to be pragmatic about good design as you are coding. I also like the automatic formatting features.
- The QML Documentation is not quite complete, but it is systematic. I am looking forward to more samples, though, that's for sure.
In my first few experiences with QML, I was a tiny bit thrown by the "declarative" nature of QML. However, after a while, I found that my normal Object Oriented thought processes transferred quite well. The rest of this post is about how I think about coding up classes and objects in QML.
In Python, C++, and most other languages that support OO, classes inherit from other classes. JavaScript is a bit different, objects inherit from objects. While QML is really more like javascript in this way, it's easy for me to think about creating classes instead.
I will use some code from a game that I am writing as an easy example. I have written games in Python using pygame, and it turned out that a lot of the structure of those programs worked well in QML. For example, having a base class to manage essential sprite behavior, then a sub class for the "guy" that the player controls, and various subclasses for enemies and powerups.
For me, what I call a QML "baseclass" (which is just a component, like everything else in QML) has the following parts:
- A section of Imports - This is a typical list of libraries that you want to use in yor code.
- A definition of it's "isa"/superclass/containing component - Every class is really a component, and a compnent is defined by declaring it, and nesting all of it's data and behaviors in curly brackets.
- Paramaterizable properties - QML does not have contructors. If you want to paraterize an object (that is configure it at run time) you do this by setting properties.
- Internal compotents - These are essentially private properties used within the component.
- Methods - These are methods that are used within the component, but are also callable from outside the component. Javascript does, actually, have syntax for supporting private methods, but I'll gloss over that for now.
In my CharacterSprite baseclass his looks like:
Imports
 import QtQuick 2.0
 import QtQuick.Particles 2.0
 import QtMultimedia 5.0
Rectangle is a primative type in QML. It manages presentation on the QML surface. All the code except the imports exists within the curly braces for Rectangle.
Paramaterizable Properties
   property int currentSprite: 0;
   property int moveDistance: 10
   property string spritePrefix: "";
   property string dieSoundSource: "";
   property string explodeParticleSource: "";
   property bool dead: false;
   property var killCallBack: null;
Internal Components
For readability, I removed the specifics.
   Repeater
   {
   }
   Audio
   {
   }
   ParticleSystem
   {
     ImageParticle
     {
     }
     Emitter
     {
     }
   }
Methods
With implementation removed for readability.
   function init()
   {
    //do some default behavior at start up
   }
   function takeTurn(target)
   {
    //move toward the target
   }
   function kill()
   {
    //hide self
    //do explosion effect
    //run a callback if it has been set
   }
 CharacterSprite
 {
   spritePrefix: "";
   dieSoundSource: "zombiedie.wav"
   explodeParticleSource: "droplet.png"
   Behavior on x { SmoothedAnimation{ velocity:20}}
   Behavior on y { SmoothedAnimation{ velocity:20}}
   height: 20
   width: 20
 }
I can similarly make a GuySprite for the sprite that the player controls. Note that
I added a function to Guy.qml becaues the guy can teleport, but other sprites can't.
I can call the kill() function in the collideWithZombie() function because it was inherited from the CharacterSprite baseclass. I could choose to override kill() instead by simply redefining it here.
 CharacterSprite
  {
   id: guy
   Behavior on x { id: xbehavoir; SmoothedAnimation{ velocity:30}}
   Behavior on y { id: ybehavoir; SmoothedAnimation{ velocity:30}}
   spritePrefix: "guy";
   dieSoundSource: "zombiedie.wav"
   explodeParticleSource: "droplet.png"
   moveDistance: 15
   height: 20;
   width: 20;
   function teleportTo(x,y)
   {
    xbehavoir.enabled = false;
    ybehavoir.enabled = false;
    guy.visible = false;
    guy.x = x;
    guy.y = y;
    xbehavoir.enabled = true;
    ybehavoir.enabled = true;
    guy.visible = true;
   }
   function collideWithZombie()
   {
    kill();
   }
  }
So now I can set up the guy easily in the main qml scene just by setting connecting up some top level properties:
   Guy {
     id: guy;
     killCallBack: gameOver;
     x: root.width/2;
     y: root.height/2;
   }

Hi, great post! Cleared up a few things for me
ReplyDeleteHi , I am facing a issue, where I am not able to see supported Platform as "Mobile". So if I create any Application I see only supported platform as "Desktop". My ubuntu os 12.04 LTS and QT creator 2.7 based on Qt 5.0.1. It will great if you can assists me on this. Thanks.
ReplyDeleteReally amazing and great post, thanks gor share,
ReplyDeletefunny pictures
this is very useful information for me
ReplyDeletefunny pictures
Very stunning and excellent post it's also useful information for us so thanks a lot for sharing us
ReplyDeleteclipping path service
Really it's an effective post. I learned a lot from here. Thank you so much for sharing.clipping path
ReplyDeleteclipping path service/Raster To vector
thanks for your nice blog and this good informastion for me . . .
ReplyDelete